


at the beginning of the spring/summer, my baby girl was outgrowing all of her headbands that i had made for her...before she was even born (que tears...has it really been a year and a half already?!). so instead of going out and buying her some new hair pieces, i of course pulled out my box of scrap fabric and made up some new bows.
her hair is now long enough to wear two cute little pigtails, so i made 2 bows each of like, every color fabric i own...that's a lot of bows! want to learn how to make one? read on friend...

S U P P L I E S:
» clips (i bought mine in a 12 pack from Sally's, but HERE is a way better deal on Amazon-with Prime shipping. wish i would have done that and saved some $$!)
» fabric colors of choice
» fabric scissors
» hot glue + glue gun


T O B E G I N :
» cut your fabric into approximately a 3 1/4"x4" size. this might differ slightly, depending upon how big or small you actually want your bow to be.
» fold in half, right sides (the pattern side you want shown at the end) together, and sew, leaving a small gap (but big enough for your to turn your fabric right-side-out!) at the bottom/where the two open sides meet
» turn fabric right side out


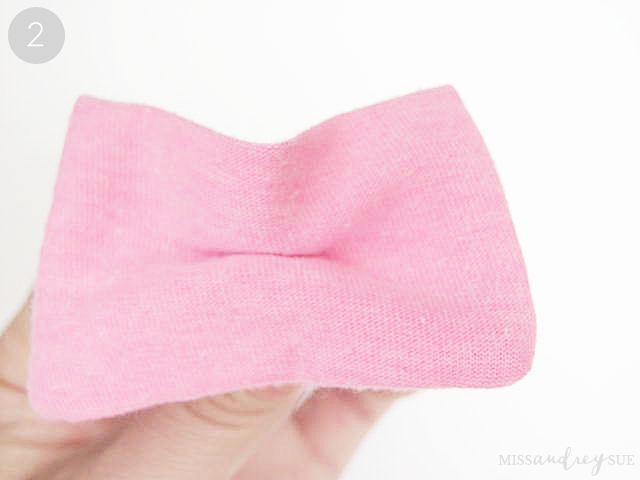
S T E P 1 :
» place a single dot of hot glue in the middle of your square piece of fabric
S T E P 2 :
» hold the back/opposite side of the fabric until the glue dries (like a few seconds), set aside

S T E P 3 :
» cut out a strip of fabric, about 1.5"x4" (doesn't have to be exact, but wide enough to cover the middle of your bow, and long enough to wrap around the middle of your bow)
» fold it in half and sew down the side (in this example, you'll see that i actually turned it right-side out, but that ended up taking waaaay too much time for me. so with the others i simply put the right side of the fabric out ,and sewed along the side, then placed the seam along the back so that it wouldn't be shown)

S T E P 4 :
» a little down from the top of the strip of fabric, place a small amount of hot glue, and close the clip around it, let dry

S T E P 5 :
» place another dab of hot glue on top of that, and place your bow on (this is where you can kind of make it start to take shape)

S T E P 6 :
» this is what it will look like from a top view. now you are going to cut off that top (or extra) piece of fabric)

S T E P 7 :
» cut off the top excess bit of fabric

S T E P 8 :
» this is what it will look like now. you shouldn't be able to see the top of the strip of fabric

S T E P 9 :
» being careful to hold the clip OPEN, place a dab of hot glue on the back of the bow/actually the back of the strip of fabric, and wrap the strip of fabric up and around the bow, let dry. remember to NOT close the clip until AFTER you wrap the strip of fabric around, because if you close it, you'll end up gluing your clip shut! (yes, i did this on accident a time or two! haha...it's annoying)

S T E P 10 :
» cut off the excess fabric hanging down

S T E P 11 :
» bow finished!
» place in hair and "ooo" and "awe!"...and then take a pic or two :)

here's a behind the scenes pic from when i actually shot these bows! haha yes, in my son's room (it has the best light!), on the floor, with a piece of foam board. super legit.


and here's my little Miss T showing a few of them off!
No comments